|
|
PATRIOTIC CRAFTS AND ACTIVITIES
Safety Pin Flag
Denver Area Council
Materials:
11 Size 1 gold safety pins
33 red seed beads
28 white seed beads
20 dark blue seed beads
1 inch red plastic tape ½ in. wide
Duco cement (optional)
Instructions:
1. On five pins thread on red and white beads. Start with red alternate with white and end with red. Use nine beads on each pin.
2. On four pins thread five blue beads on first and then alternate red and white beads starting with white and ending with red.
3. Open a pin and thread on the nine bead covered pins stating with the red and white five and then put on the remaining four blue ones. Keep all the beaded sides forwards.
4. Using the tape attach the last remaining pin (backsides) together with the one holding the completed flag. Use the top pin to attach it to your shirt.
String Flag
Denver Area Council
Red, white and blue string (or use cotton rug yarn or knitting worsted)
1/2" headless nails (brads)
Piece of plywood, 13 1/4" x 18"
Sand the edges of the plywood until smooth. Along each short side, draw a line about 1/4" in from the edge as a guide for inserting the nails. In the upper left-hand corner of the plywood, mark off an area, 7" x 8", for the field of stars. Hold the nails with pliers, and hammer them about halfway in, every 1/4" as shown, along the sides of the flag and the end of the field. You should have 52 nails along each side and 28 nails at the end of the field. Each strip uses four nails on each side. Begin by tying red string to the first nail. Bring the string back and forth around the nails, tying off on the fourth nail. Continue as above, alternating the red and white stripes. For the field, begin at the upper left-hand corner. Knot blue string around the first nail; string as before. Tie off on the last nail at the lower right hand corner of the field; Evenly space fifty 1/2" gummed silver stars on the field. When they are properly positioned, pick up each star with a tweezers, apply a dab of glue to the back and lightly press it onto the field. Glue metallic braid around the outside edge. Tack a sturdy cardboard or wood easel to the back.
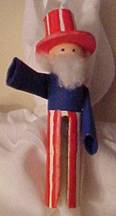
UNCLE SAM SLIDE
York Adams Area Council
Debbie Kalpowsky
Materials:
• Round head wooden clothespin
• Paints, red white and blue
• White ‘wonderfoam’ or posterboard
• White paper
• Cotton ball
• ¾-inch PVC slide ring
|
|
Equipment:
• Hot glue
• Paintbrushes
• Small craft saw
• paperclip
Directions:
1. Cut the points off the clothespin.
2. Paint the lower half of legs white, allow to dry.
3. Paint the upper half, up to neck a dark blue.
4. Make a small roll of paper, glue into shape and paint same color blue as upper half.
5. Glue arms onto upper part of the clothespin.
6. Cut out a hat brim to fit the head of the clothespin,
7. Paint white paper with red stripes, or use a permanent marker to do such
8. Paint red stripes on the white pants.
9. Paint the head of the clothespin, make flesh color by adding a small amount of red to white paint.
10. Roll the striped paper to fit inside the hat brim and glue in place
11. Glue hat to head of the clothespin, adjusting angle to fit,
12. Straighten out paperclip, dip one end into blue paint and dot eyes onto face.
13. Using a pinch of cotton ball, form a beard and glue onto lower face.
14. Roll another piece of cotton, glue hair around head under the hat.
15. Mount the slide ring to back of your finished Uncle Sam using hot glue.
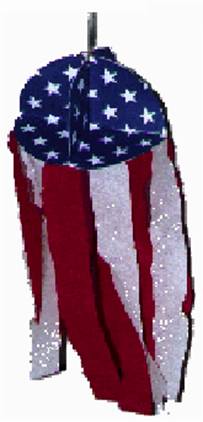
FLAG SLIDE
York Adams
Debbie Kalpowsky
Materials
• United States Flag (approximately 2x3)
• Heavy plastic, cut the same size as your flag
• ¾ inch PVC slide ring
Directions
Glue the flag to the piece of heavy plastic
Mount the slide ring to the back of the heavy plastic.
STOVEPIPE HAT FAVOR CUP
York Adams
Area Council
Decorate 4-ounce white paper cup with narrow, red gummed tape. Brim is a circle of blue construction paper glued to the bottom of the cup and turned up on sides. Band around the crown is a strip of blue construction paper decorated with silver stars. Fill with candy or nuts. Variation: Use 7-ounce striped cups and eliminate taping.
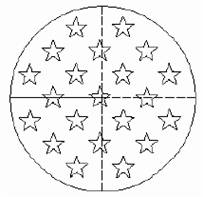
STARS & STRIPES
SPINNER
York Adams Area Council
Materials:
• Glue
• 12 Crepe Paper Streamers - 18" Long
• 3' String
• Scissors
• Hole Punch
DIRECTIONS:
1. Enlarge to 8 1/4" and make 5 copies of star pattern circle. Each circle is divided into quarters by 3 dotted lines and one solid line. On four of the circles, cut on the solid line to the center of the circle.
2. Crease on the dotted lines, folding printed pattern to the inside. First one way, then the other way.
3. Form a pocket to catch the wind by folding as shown, overlapping one quarter of the circle onto the next quarter.
4. Glue overlap into place. Repeat for the three other slit circles.
5. Glue the four pockets together to create a half ball.
6. Cut streamers to 18". Glue ends around perimeter of the bottom. Glue the 5th circle to the bottom over the streamer ends.
7. Use punch to make 2 holes in the top of the ball about 1/2" from the edge. Feed string through. Tie ends.
8. Hang from tree and watch it spin.
|
|
|
|
|
|
|
|
Patriotic Pencil Holder
![]() Materials: small juice can or toilet
paper tube with cardboard bottom added on one end; craft sticks, paint,
glue
Materials: small juice can or toilet
paper tube with cardboard bottom added on one end; craft sticks, paint,
glue
1. Paint the craft sticks red and white and blue.
2. Wash and dry the juice can. Make sure there are no sharp edges around the open end.
When dry, glue the craft sticks around the outside of the can in any pattern you desire.
Liberty
Shaker
Materials: tissue paper tube, small bells, cardboard circles (to close off ends of tube), clear report folder or clear acetate, colored tape, star stickers
1. Fill a cardboard tissue tube with about a dozen small bells. Seal the tube by taping the cardboard circles to the ends.
2. Next, cut a 6 by 20 inch rectangle from a clear report folder or clear acetate and fringe the 6-inch edges by making a series of 8-inch-long cuts. Attach sticker stars to the fringe.
3. Wrap the rectangle around the tube so that the fringe extends from the ends, and secure it with tape. Then decorate the shaker with colored tape stripes and more sticker stars.
Stars And Ribbons
Materials: rolls of red and white crepe paper or red and white tissue paper, crayons or markers or blue construction paper, stapler, glue sticks, scissors
Make a template pattern of a large star and a 2-3 smaller sized stars. Have the boys trace the patterns on blue construction paper and cut them out. Cut crepe paper into two feet lengths. Staple them together and then glue them onto the back of the big star. Glue the small stars onto the front of the ribbons so they can be seen. Tell the kids to hang the “Stars and Ribbons” craft prominently in their windows at home.